How to set up your own AI server using Ubuntu, Docker, Ollama, and Open WebUI
Posted in Computers, Homelab, and Linux on October 13, 2025ChatGPT and Grok are super cool, but what if you want to run your AI stuff in your home, on your equipment, with full control over the privacy and security of your information? Well, it’s totally doable, completely free (assuming you already have the hardware or are willing to invest in a powerful enough system), and even kinda fun!
AI comes in many shapes and sizes, and you can do a lot more with it than what’s in this guide, but I’m going to walk you through the basics of the following:
- The Hardware/GPUs
- Ubuntu Server
- Ollama
- Gemma3
- Docker
- Open WebUI
Of course, there are so many models to choose from, and you can do way more in terms of integration with other systems and software, like the Continue plugin for VSCode, but in this guide, we’re going to keep it simple and simply end up making something that functions similar to ChatGPT or Grok, with basic text prompting.
The Hardware/GPUs
In my case, I set up a new, separate system with one purpose, as an AI server. You can configure Ollama and Open WebUI on your local computer as well, but the configuration will be slightly different – this guide assumes you’re running it on a separate dedicated server on your home network.
The most important thing for the performance and capability of your AI server is GPU and that GPU’s VRAM. In terms of selecting a GPU, you need one or more nVidia GPUs. Although I’d love to save money and avoid giving the big greedy green GPU maker money, nVidia GPUs are simply the best supported and most efficient solution for AI.
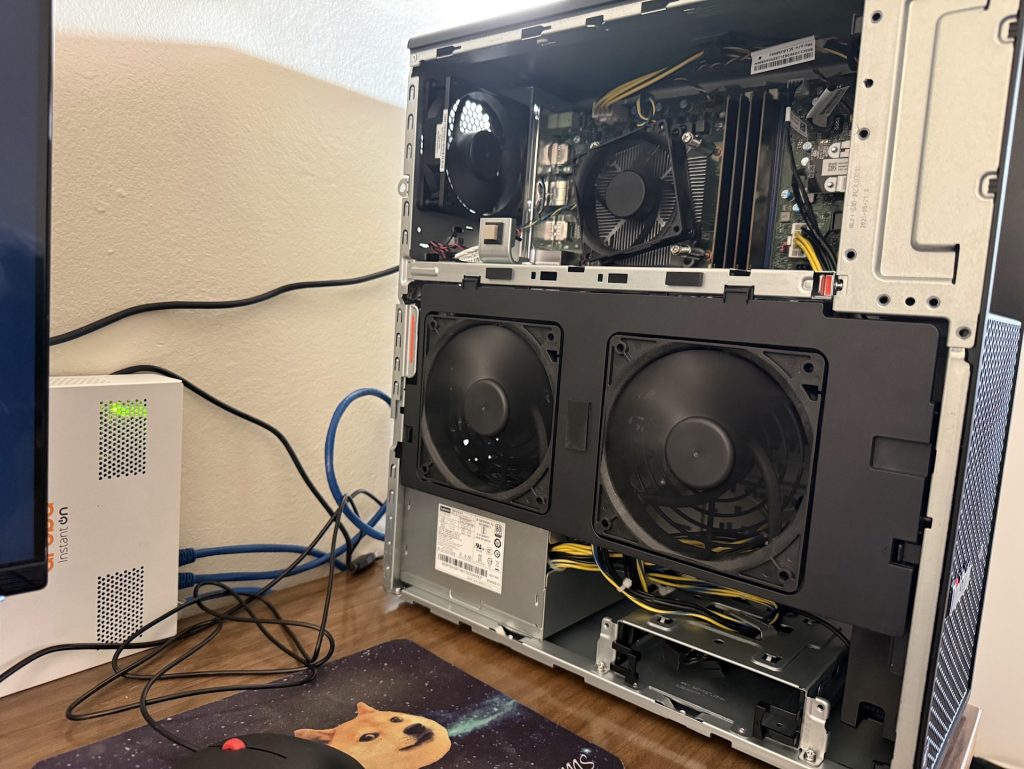
For my AI server, I started with a Lenovo workstation PC that was on sale, and modified it with some other components and parts I already had on hand, or ordered separately… as buying any upgraded components from Lenovo directly is just insanely expensive.
The base computer I purchased on sale using promo codes for $854 got me:
- Lenovo ThinkStation P3 Tower Gen 2 (Intel)
- Intel Core Ultra 5 235 CPU
- 16GB (1x16GB DDR4) RAM
- 512GB NVMe SSD
- 750W PSU
Additional components I purchased/changed:
- 64GB DDR5-5600 Crucial RAM off Amazon (4x 16GB, and I used the 16GB stick that came with the PC for some other computer). Retail cost of this would have been $220, but if I was buying just for this project, I’d have gone with 2x 32GB sticks to leave space for future upgrades… I simply already some of these floating around, so I didn’t pay full price. In theory, you could just buy a single 16GB stick of RAM and add it to the 16GB stick that came with the system… I just like things to match.
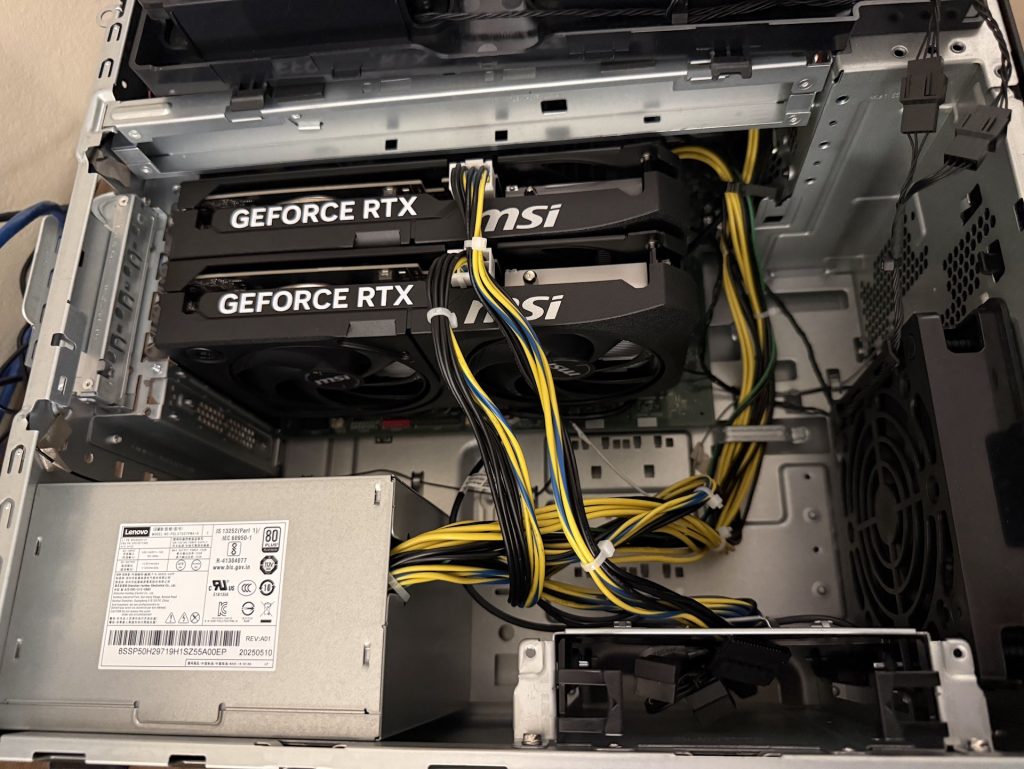
- 2x nVidia GeForce GTX 5060 Ti 16GB GPUs. I went for an MSI Shadow variant as it was on the cheaper side of things. This worked out perfectly, because the power connected is right in the middle of the two included side panel fans in the Lenovo system. I didn’t plan this – just got lucky. My configuration of Lenovo’s 750W PSU has two 8-pin PCI-E power connectors, and is plenty for this configuration. If you’re using larger or better cards, just custom build a computer. If you’re going with RTX 5060 Ti’s as well, BE SURE TO GET THE 16GB VARIANT. The cheaper 8GB variant is trash and shouldn’t exist. Current versions of Ollama support multi-GPU configuration to pool available VRAM, which is why I bought two 16GB cards instead of a single larger card… those get expensive real quick. If you can afford a 5090 with 32GB of VRAM or a professional grade RTX card, good for you – but I can’t.
There is a note in the Lenovo documentation for the ThinkStation P3 Tower Gen 2 (Intel) that the VRM heatsink is not standard on the cheaper configurations, but that it’s recommended to use it if you are adding a dedicated GPU, or upgrading the CPU. I intended to use the earned rewards points from buying the computer to order that part after the fact. Sadly, as of the time of this writing, Lenovo’s website has been completely worthless for achieving this. If I go to order parts for my system, it says nothing is available, neither of the part numbers quoted in the documentation are anywhere to be found, and after arguing with their AI support chatbot for 5 minutes I finally got the ability to get transferred to a real human… at which point the chat closed because I didn’t have any Lenovo products registered in my account. But, every time I tried to register my product, it said my serial number was invalid. Very frustrating!
Note: In my configuration, the side panel fans on the Lenovo workstation were set up in an exhaust configuration. I flipped those around to blow cold air onto the GPUs, because it made more sense to me. But that’s just my opinion based on over a decade of building computers. You can probably just leave it alone.
Ubuntu Server
There are so many choices for OS. You could probably use Windows and WSL if you wanted to, Proxmox, or pretty much any modern Linux distro. I simply choice Ubuntu Server as I am familiar with it. Version 25.10 is the latest, so that’s what I downloaded.
Prepare Install Media
The easiest way to get Ubuntu’s installer is to download it on their website, and then use Balena Etcher to flash that onto a USB flash drive. Then, boot to that USB flash drive. On our Lenovo, you can do this by mashing the Enter key before it boots into Windows, but that’s different on every system. Other systems, the boot menu key could be Esc, F2, or something else.
Install Ubuntu Server
Be sure to give your server a fixed IP on your LAN. Whether you do this in your router’s DHCP reservation or define it during Ubuntu installation is up to you. In my home, I have the DHCP pool as IP’s 100-200, and manually configure my servers and other stuff in the range below that. In my case, manual configuration for the IPv4 address of my Ubuntu Server is as follows. Yours may vary.
Subnet: 192.168.1.0/24
IP Address: 192.168.1.90
Gateway: 192.168.1.1
DNS: 192.168.1.1
Be sure to enable OpenSSH during installation. You can also install third-party drivings during install, to enable the nVidia GPUs, but you can also do it later. I prefer doing it later for more control over the version, but that’s up to you. Once Ubuntu is installed, reboot, and SSH into your server.
Update Ubuntu Server
sudo apt update
sudo apt upgrade -y
sudo reboot
Install nVidia Proprietary Drivers
If you didn’t do this during installation, be sure to do this. Select the proprietary drivers – they work better than open source options.
sudo apt install ubuntu-drivers-common -y
sudo ubuntu-drivers install
When you are done, reboot the system again.
Expand Disk Space
By default, on my 512GB SSD, Ubuntu only made the root partition 100GB. I didn’t catch this during installation, so after downloading some different models, I ran out of space, and had to expand / to use the rest of my drive. If you run into this problem, here’s how you fix it. Then, confirm via df -h to see what’s up.
sudo vgdisplay ubuntu-vg
sudo lvextend -l +100%FREE /dev/ubuntu-vg/ubuntu-lv
sudo resize2fs /dev/mapper/ubuntu--vg-ubuntu--lv
df -h
Ollama
Ollama is the core of our project. It is a very easy way to run AI models on your system, and it easily manages models and the available resources like GPUs, CPUs, and memory.
To get started with downloading and installing Ollama, run this command:
curl -fsSL https://ollama.com/install.sh | sh
Gemma3
If you look at Ollama’s Models page on their website, you’ll see so, so many. Feel free to experiment with as many as you want, but I’ve found Gemma3 to be one of my favorite general purpose models.
When you’re downloading models from Ollama’s site, you have some options. You can just choose the latest version, or you can choose the specific size you want. In our case, with 32GB of VRAM to play with, we want the largest version… in this case, 27 billion parameters.
Note: You typically want to choose the largest one that will fit within your VRAM. Keep in mind that if you have multiple of the same nVidia GPUs (like I do) with the drivers configured correctly, the VRAM is cumulative. So, my two 16GB cards means I can use models up to 32GB in size without offloading to CPU and system memory.
Here’s how you would get the 27 billion parameter version of gemma3, which is about 17GB in size:
ollama pull gemma3:27bThat might take a few minutes to download, depending on the speed of your internet. Now that we have Ollama, and an AI model to work with, we need Open WebUI, which gives us a ChatGPT-like web interface. The recommended way to use that is Docker. So, let’s get Docker.
Docker
sudo apt install -y apt-transport-https ca-certificates software-properties-common
curl -fsSL https://download.docker.com/linux/ubuntu/gpg | sudo gpg --dearmor -o /usr/share/keyrings/docker-archive-keyring.gpg
echo "deb [arch=$(dpkg --print-architecture) signed-by=/usr/share/keyrings/docker-archive-keyring.gpg] https://download.docker.com/linux/ubuntu noble stable" | sudo tee /etc/apt/sources.list.d/docker.list > /dev/null
sudo apt update
sudo apt install -y docker-ce docker-ce-cli containerd.io
sudo systemctl start docker
sudo systemctl enable docker
Assuming you have Docker up and running, let’s create our first Docker container!
Open WebUI
Let’s install Open WebUI. For future reference, I’m going to call it OWUI as typing Open WebUI over and over again is getting tiresome.
Note: At the time of this writing, we’re using Open WebUI version 0.6.33. I doubt future updates will greatly change things any time soon, but it’s worth noting in case commands or the user interface change over time.
My configuration will assume you are running it on a dedicated separate machine, not your local machine. I chose to use a different port than the default one, as I already use 8080 for other stuff, and wanted to make port forwarding simple. Initially I tried to use 6666 because I thought it would be funny, but that turned out to be a failure as it’s apparently typically used for port scanning and is blocked by some software – Oops! So, in the end, I chose port 8888.
So, the command we should is as follows:
sudo docker run -d --network=host -e PORT=8888 -v open-webui:/app/backend/data --add-host=host.docker.internal:host-gateway --name open-webui --restart always ghcr.io/open-webui/open-webui:mainOnce your container is ready, access OWUI from your browser. In my case, the web address is http://192.168.1.90:8888, but as we already discussed, your IP and port may be different.
Assuming neither you nor I made any mistakes up to this point, OWUI should load. It’ll ask you to create an Admin user account. You can use an actual email address, or make something up, as this email will be your login and nothing more – you won’t actually get emails from it. I used my address, so something like [email protected], but you do you.
Connecting Open WebUI to Ollama
Once you’re logged into OWUI, go to the Admin Panel. Find the Admin Panel by clicking on your user icon in the bottom left, and selecting Admin Panel
Along the top, you’ll see the main tabs. The one we care about right now is Settings. Click on that, and then select Connections, the second section.
You’ll see a section named Ollama API, with a list of Ollama API connections. If you click on the gear icon next to that one, you’ll see a refresh button, which will test the connection. For me, even though it prefilled some Docker configuration, as we are using Docker, I had to change this from the docker host to localhost. After fixing that, test the connection again, and you should see a “Server connection verified”. If that works, hit Save.
The server URL that worked for me is this:
http://localhost:11434Changing Model Settings
Assuming your server connection worked, you should now be able to go to the Models section of the settings, and you’ll see the Gemma3 model you downloaded earlier. By default, this model is only available to your admin user. But, if you plan to add regular users to your server, you’ll want to tweak this setting.
Click the edit icon (it looks like a pencil) and change the Visibility from Private to Public. Now, other users on your server can access this model.
Great job, now let’s chat!
Test and Verify
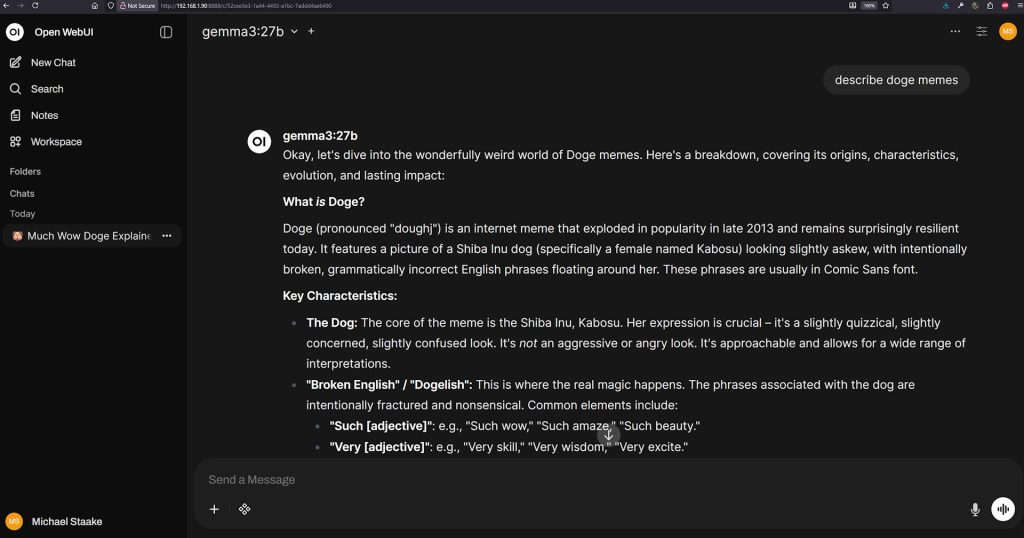
Go to New Chat on the left side of OWUI, and you should see a somewhat familiar interface if you’ve used other web-based AI chat LLMs. If your configuration is correct, you’ll see gemma3 is pre-selected. Go ahead and type something in, for example “describe doge memes” or “how much fur is on the average dog.”
It might take about 10 seconds for Ollama to load Gemma3 into VRAM. By default, it’ll keep models you’ve recently used in VRAM for a few minutes, to ensure follow-up responses are quicker. Once the model is loaded, you should start receiving your response.
The speed of the output will depend on the AI model you’ve installed, and your server’s configuration, but here are a few ways to make sure everything is working fine, and that Ollama is using your GPU, and not CPU.
Is it fast?
How fast it responds and generates will depend on your configuration, but if the LLM is fully loaded into your GPU, it should be quite fast. If it’s super slow, something might not be set up right, or the size of your model exceeds your VRAM.
ollama ps
Ollama can show you exactly what it’s doing. Use the “ollama ps” command to see what’s going on. Ideally, you would be using 100% GPU. If you see 100% CPU, or some combination of the two, try a smaller model or buy a better GPU. Here’s some example output:
michael@ai:~$ ollama ps
NAME          ID              SIZE     PROCESSOR    CONTEXT    UNTIL
gemma3:27b    a418f5838eaf    21 GB    100% GPU     4096       4 minutes from now
nvtop
Another great resource is nvtop, which gives you an htop-like interface, but for GPUs. Run the “nvtop” command to use it. It works via SSH, or looks nicer if you run it directly on a monitor connected to the server. If the nvtop command doesn’t work, install it like so:
sudo apt install nvtop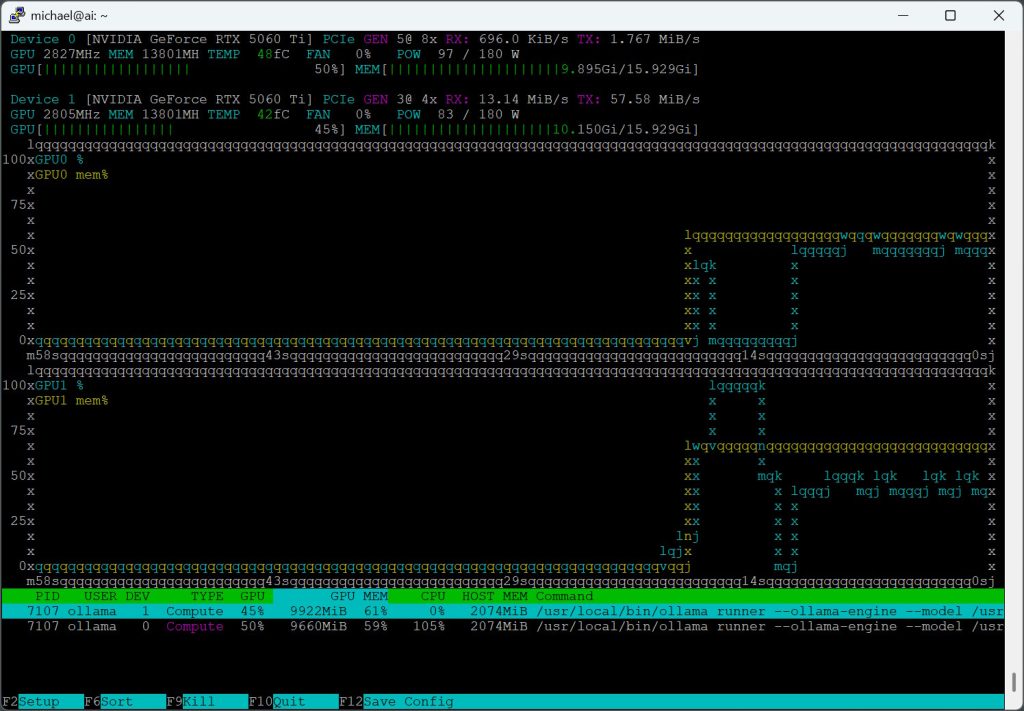
In Conclusion
There is much, much more you can do. Ollama is awesome, but other solutions give you more models to choose from. Different models offer different capabilities. And Open WebUI has oodles of features you can customize. You can even use the OpenAI-compatible API to connect VSCode or other software. But in this guide, we started with the basics, and got to you a point where you have something that looks and works similar to mainstream stuff like ChatGPT. Enjoy!